Cuttings - Taking Softwood Cuttings. How to take softwood cuttings from plants.
Taking softwood cuttings from your hardy garden plants is a good way to increase your stock. It is not the easiest method of taking cuttings, but the main advantage is the fact that because softwood cuttings are taken early in the growing season, they have a long time to get established as young plants before the onset of the following winter.
The main period for taking softwood cuttings is spring and early summer - though they can be taken for most of the growing season. Once you master the technique - just a matter of a little bit of care - you will be well on the way to being a provider of plants for friends and plant fairs. Who knows where it will take you? It will certainly broaden your circle of friends!
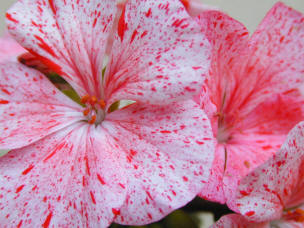
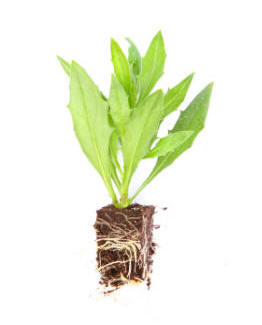
A well rooted cutting from a Cape Daisy - Osteospermum.
Moisture Content and conservation.
Many garden shrubs and hardy plants can be propagated by the softwood cuttings method. It is also used for increasing stock of garden chrysanthemums, dahlias, pelargonium geraniums, and fuchsias. (Geraniums can also be grown from seed).
 Softwood cuttings can be started in a greenhouse, a
kitchen/bathroom widowsill, a heated - or unheated propagator, or
even in a suitable container outdoors.
Softwood cuttings can be started in a greenhouse, a
kitchen/bathroom widowsill, a heated - or unheated propagator, or
even in a suitable container outdoors.
An important point to bear in mind, is that by its very nature, a soft wood cutting is taken from a rapidly growing part of the plant. As such, it will be dependent upon moisture in order to survive. This is not so critical with ripe or hardwood cuttings!
At all times in the process of taking and striking your soft wood cuttings, you should do all you can to preserve the moisture content of the section of the plant that you have removed from its moisture supply!
Softwood cuttings are best taken in the early morning - though can be taken at any time with care. Early morning cuttings are usually turgid and not flagging because of moisture loss as is sometimes the case with cuttings taken later in the day. Evening time - about 1 hour after the sun has gone down is also a good time.
When taking your cutting, place them into a plastic bag - tied at the top until you are ready to place them in their propagation positions.
Taking the Soft Wood Cutting.
Use a sharp knife - a craft knife is
ideal, but be extra careful about how you use it!
Most soft wood cuttings are between 2 and 4 inches long. Longer cuttings are
harder to keep, owing to the increased foliage area, and lack of roots to supply
the foliage with water. Ideally, the cutting will have 3 4 pairs of leaves. More
than this will cause problems as the lack of roots will cause the plant to wilt
as the excess leaves transpire (sweat) therefore losing moisture. However,
leaves ARE necessary to provide the food for building the root system.
Generally, the cut should be just below a leaf joint. A clean cut - maybe by placing a larger portion of the shoot on a bench and cutting down onto a suitable surface. This is where the sharp knife comes into play. (The cutting material can actually be collected from the parent plant by cutting off a shoot with a pair of secateurs. The softwood cutting can then be taken off that portion of the shoot.)
Some plants - such as chrysanthemums, geranium, fuchsias etc, are normally bought into early growth in a greenhouse in late winter/early spring. Cuttings are taken off the host plant as an when they appear. It is possible to obtain many cuttings over the course of a month by using this method.
Gently insert the gutting into the compost, using a dibber - or pencil - to make the hole in the compost.
Use rooting hormone powder or gel if you wish. It DOES help, but do NOT overdo it.
Make sure that you remove any dead or fallen leaves on a daily basis, but do not leave the cover off for too long. Again. early morning or evening is best for this.
Once the cutting is inserted into its position, then drench it and the compost with a general fungicide. This is probably all the moisture that it will need before it starts to root - as long as the propagating container is airtight.
Compost and Containers for softwood cuttings.
Cuttings such as fuchsias, shrubs and perennials can be inserted into normal pots - 4in is suitable for maybe 4-5 cuttings inserted around the edge. The main thing is that the pot should then be covered as soon as possible in an airtight container. A clear plastic bag tied at the top will do the trick ok.
Special propagators will also be suitable, but make sure that you get one with a clear lid/cover that is high enough to cover the cutting without 'sitting' on it. Most propagators are designed for seedling production - so a cover just a couple of inches high is suitable for that. Not so for growing cuttings.
Heated propagators supply gentle heat to the base of the cutting - in the compost - and assists rooting considerably. Pots placed on a greenhouse stage with a heater underneath (GENTLE heat) will also serve this purpose.
A novel idea I have seen recently, was by the use of a plastic mineral water bottle! The bottle was cut in two - about 4in (100mm) from the bottom, compost and cuttings inserted, and then 'welded' back together with a strip of waterproof tape. Insulation tape normally does the trick! The screw top is kept in place, until the new roots are observed, then the top is taken off to allow some air to enter, then the fastening tape gradually removed over a few days to allow the new plant to acclimatise to the outside environment! A perfect rooting environment!
The compost to use is a matter of choice. Ordinary multi-purpose compost is normally ok - but best if also mixed with either vermiculite or sharp sand. 25% sand/vermiculite to 75% compost. Professionals ten to use 50/50 peat to sharp sand or vermiculite mix. In this case, there is no feed in the compost, so light feeding will need to take place as soon as rooting of the cutting takes place.
Light and Environment.
The cutting will require light to perform its task of putting roots on for you. However, the cutting should not be placed in a position of bright sunshine - especially if you are taking later cuttings in early summer. Clear plastic cover is usually best, and if made airtight around the cutting, a mist will form on the inside if the plastic. this will help to diffuse the direct rays of the sun.
Alternatively, a milky white plastic cover can be used if in full sunlight.
The main aim is to keep the cutting in a humid environment. Air circulating inside the propagating container will certainly lead to the cutting dehydrating - resulting in certain loss.
Aftercare
Experience will normally tell you how long your cuttings will take to root. If you do not have that experience, then do not be tempted to take off the cover every day to see how it is doing. Most cuttings will take at least three weeks before rooting. A sure sign that the cutting has started to root, is if the part above ground starts to grow new leaves and shoots.
If your cover is airtight, then the cuttings will not require regular watering. Removal of the cover should take place in early morning or evenings, and if the compost is dry, then watering - again with a fungicidal solution - will be necessary. Do not flood the compost.
After there are signs of rooting, then the cover can be removed gradually to allow the new plants to get acclimatised to their new environment. Do this over a few days and gradually. The cover can normally be completely removed after 6-8 days.
Potting Up.
Do not leave your cutting too long after rooting before you pot it into its first pot. It should be removed and re-potted before the roots become entangled with the other cuttings.
Water well about 1 hour before you remove your rooted cutting. Do NOT do it in full sunshine. Treat gently, and tease the roots out of the pot or compost. Pot into a pot that will be suitable for a couple of months - normally a 4in (10cm) pot is suitable for this, then on into a larger container when necessary.
When first potted, keep the new plant out of direct sunshine and away from draughty spots until established. The newly potted plant is best given a weak feed of tomato liquid fertiliser to get it off to a good start, and also a feed of osmocote, to keep it nourished for the first growing season. Osmocote type fertilisers do not start releasing their life-giving nutrients for around 2-3 weeks.
Taking Cuttings Main Page | Semi Ripe Cuttings | Hardwood Cuttings
Best Selling Gardening Products
Popular Gardening Sections


Problems
Identify Weeds in The Garden - How to deal with weeds. Diseases and Pest which harm your garden and plants, learn how to prevent, deter and erradicate your garden problems.
Garden Problems
Pruning
Pruning Guide. Shrubs flower better with correct pruning. Many illustrations and examples of what to do - and when. Includes evergreens, roses, flowering shrubs, spring flowering shrubs and pruning for stem effect. This is our most viewed and comprehensive section,
Pruning
Gardening Businesses
Gardening Businesses listed in the UK counties and USA states. County and State Listings of businesses involved in Garden supplies and services. If you wish to be added to the Directory, please send us your information. Having problems, use the search box
Businesses
Gardening
In this section you will learn about Gardening Basics, Containers, Landscaping, Propagation and Soil.
Gardening
Gardening Gifts
Gardening Gifts and Reviews, Read Before you Buy
- Gardening Gifts Ideas
- Gifts For Her
- Gifts For Men
- Power Tool Gifts
- Cheap Gifts
- Personalised Gifts
- Wildlife Gifts
- Family Gifts